Trading in company stocks, securities,
futures and bonds has become very popular. Large financial banks and software developers for traders have been developing ready-made trading applications for a long time
. However, just downloading a trading platform is not enough. In order to successfully close deals and gain profit, it is important to be able to understand charts, build trends and analyze order books. Therefore, popular tools designed for simplified trading come to the fore. One of these will be discussed today. Let’s take a closer look at the WebQuick trading terminal.
- What is WebQUIK – features of a trading terminal for browser trading
- Downloading, installing and configuring WebQUICK
- General principle of software installation
- Setting up the WebQUIK trading terminal
- Step-by-step instructions for setting up the WebQUICK working environment
- Trading process in the WebQuik terminal
- The process of installing the WEB QUIK terminal at popular brokers on the example of VTB and Sberbank
- Installation principle in VTB system
- Installation in the Sberbank system
- WebQuik API – connection and configuration
What is WebQUIK – features of a trading terminal for browser trading
WebQUIK is a modern trading terminal designed to work through a browser. This software differs in that it allows you to make quick transactions with securities without using special programs. It is enough to have a home PC and access to unlimited Internet. The trading terminal is adapted for all the most popular browsers.
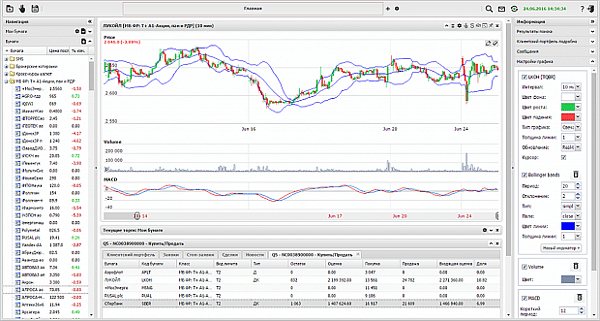
- Create a window for entering orders.
- Monitor your investment portfolio.
- Set limit transactions for securities and money.
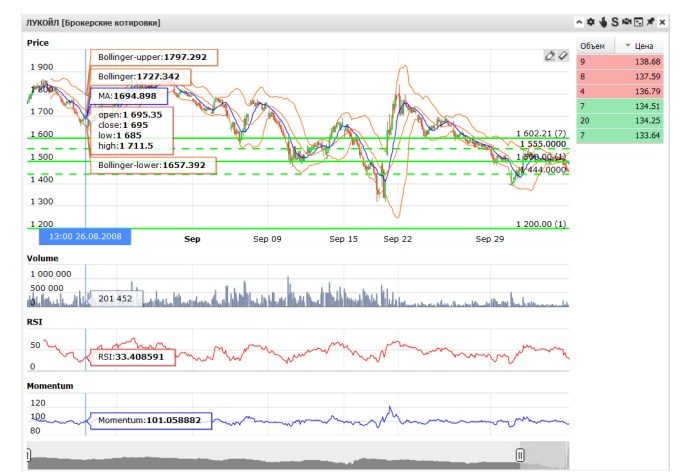
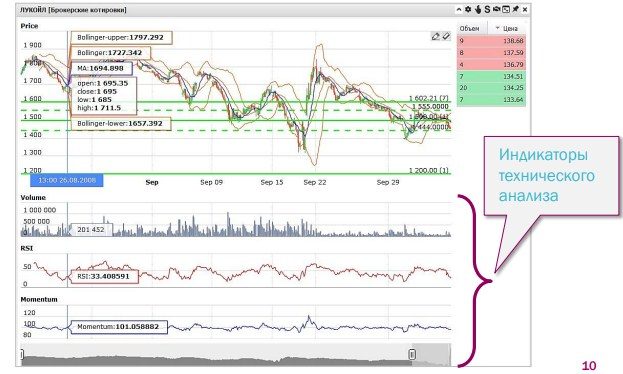
Attention! In the latest version of the program, the ability to build trends has been added, as well as the ability to use ready-made indicators for technical analysis.
- Intel Pentium processor 4.2 GHz or higher.
- RAM at least 1 GB.
- At least 2 GB of hard disk space for creating backups of the program.
- Any operating system – Linux / Windows / MacOS.
- Any modern internet browser – Opera, Google Chrome, Mozilla, FireFox, Safari.
- Unlimited access and connection to the Internet provider.
Distinctive features of WebQUICK:
- No port installation and configuration required.
- The interface is multifunctional and is a complete system for online trading.
- Automatically remembers all previously set user settings and parameters.
- For weak devices, it allows you to build an individual update interval.
- Has built-in security technology – SSL encryption.
Attention! On the official website, users can get more accurate information about the project, as well as consult on the installation and use of trading systems. Schedule of online admission on weekdays from 9:00 to 21:00 Moscow time.
Downloading, installing and configuring WebQUICK
WebQUICK is very popular among traders. Almost all brokers provide their users with the opportunity to use the Web Quick terminal in their work. Therefore, the exact method of downloading, installing and configuring the software in each banking system will differ. You can download all versions of the WebQuik terminal from the link on the official website https://arqatech.com/ru/products/quik/terminals/user-applications/webquik/
General principle of software installation
To get started, you need to identify yourself in the WebQUICK system. To do this, you need to get a login, password and a link with an address from the broker (a special URL for connecting to a place of work). After registration, the
broker will send introductory information, as well as a confirmation letter for gaining access to the email specified by the trader. When clicking on the link, the user enters personal data in the appropriate fields.
Attention! In some cases, brokers may send a link to a special adapted version of Web Quick for mobile devices. The interface is exactly the same from the phone. The only drawback is that you cannot perform non-trading operations and work with currencies.
Setting up the WebQUIK trading terminal
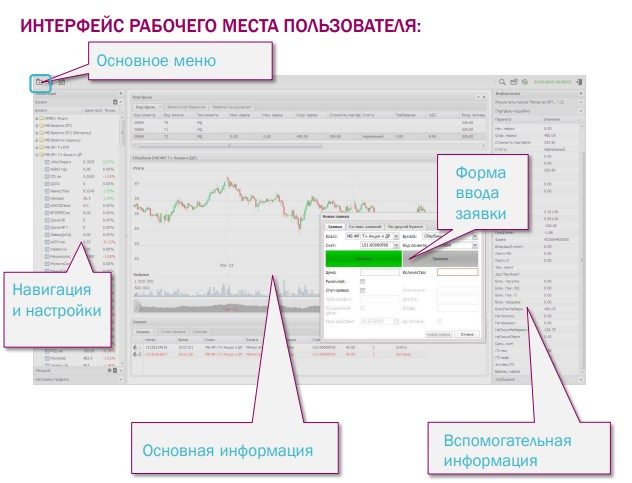
After entering the registration data, authorization in the system will take place. The device will start connecting to the WebQUIK server using SSL encrypted protocol. The interface of the user workstation is as follows:
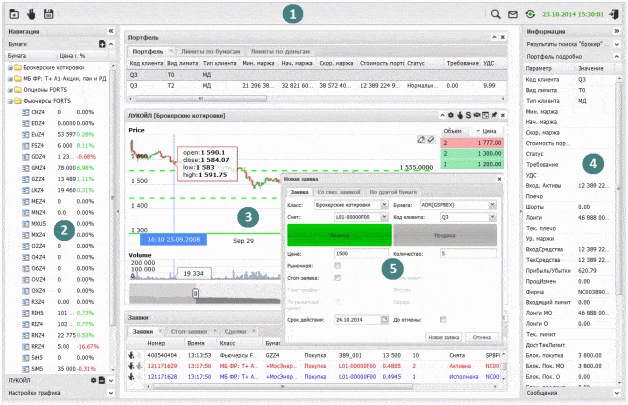
- Main menu – access to the main functions.
- Tabs – grouping of tables, program windows with the ability to quickly switch between them.
- Navigation – the entire list of securities. The item is located in the left column.
- Basic information – information about the client’s activity. It is located in the central column and is divided into several blocks.
- Auxiliary information and settings – shows information on the selected items in the table and schedule settings. Located in the right column.
- Order entry form – used to create new orders or stop orders, which are instantly transmitted to the broker’s server.

Before setting up the working environment, you need to enable pop-up windows in the browser settings, and add the service site to the exceptions.
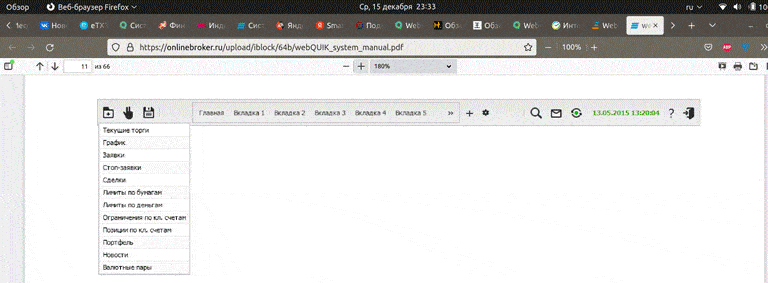
By default, the Home tab is open. To create a new tab, click on the “+” button in the main menu bar. Each of the tabs has its own number and name. The allowed number of tabs in the interface is five. To access the main functions of the system, you need to go to the main menu of the program. On the left side there are tabs “Current trades”, “Chart”, “Orders”, “Stop orders”, “Trades”, “Limits on securities”, “Limits on money”, “Limits on client accounts”, “Positions on client accounts ”,“ Portfolio ”,“ News ”,“ Currency pairs ”. Each menu item is called by pressing the left mouse button.
Step-by-step instructions for setting up the WebQUICK working environment
- Start by choosing the securities that you intend to track, buy and sell in the future. It is highly recommended to start by carefully selecting them. For example, use reputable resources like Mosbirja, Finam, RusBonds (requires free registration).

- Create one or more lists of papers for personal use. Click on the plus icon. In the window that appears, you must enter the name of the paper.

- Create work windows in the middle of the screen. To do this, click on the plus sign in the upper right part of the screen. At the first stage, it is recommended to select the “Current Trades”, “Chart”, “Orders”, “Trades”, “Trades”, “Securities Limits”, “Cash Limits” and “Client Portfolio” windows. The rest is added gradually.

- Customize windows. It is necessary for each of the above windows to select the columns that will be useful in further work.
- Configure the display of those securities from your personal list that you are going to trade.
- Save the settings by clicking on the floppy disk icon located in the upper left corner of the program.
- Transfer money to a brokerage account and start trading.
Trading process in the WebQuik terminal
The trading process is divided into two stages – buying and selling a security. In order to create a purchase request, you must click on the icon in the form of a palm with an extended index and middle fingers. The icon is located in the upper left corner of the screen, as well as opposite the “Current trading” window.


Check carefully which type of application you have chosen. Otherwise, it will be a mistake to buy the paper at a too high price, or to sell it at a too low price.
After the order has been placed, the system will start checking the amount of money, securities and the price in the order book. If the order book contains orders at a price less than or equal to the one that was initially specified, the placed order will be processed. If they are absent, the order will go to the glass and remain there until the most suitable offer appears in the glass. The progress of processing all orders can be monitored in the “Orders” and “Transactions” section. In the first window, you can withdraw and reapply. Full instructions for installing, configuring and managing the WebQuik terminal can be downloaded from the link:
WebQuik Manual Training to work with WEB QUIK: https://youtu.be/YA1XOf0IDiM
The process of installing the WEB QUIK terminal at popular brokers on the example of VTB and Sberbank
Installation principle in VTB system
Go to Webquik VTB at the link https://webquik.vtb.ru/


Attention! It is recommended that you change your password the first time you log in.
Installation in the Sberbank system
Internet trading at Sberbank is different in that the bank’s client can use two-factor authentication and install the software on his home computer. Step-by-step installation algorithm:
- Go to the Sberbank website at the link https://www.sberbank.ru/ru/person/investments/broker_service/quik?tab=install
- Select the “About the platform” section.
- Press the button “Download QUIK”. The download of the finished program distribution kit will begin.

- Download the Sberbank Investor application or go to the email address https://webquik.sberbank.ru
- Unzip and install WebQUICK. The login to enter the system is the investor’s personal code, which can be found in the application or by following the link above.
- When you first log in, you need to enter a password, which is sent via SMS automatically when you open an account. Resetting the password is called by clicking the “Get password” button in the Sberbank Investor application.
- Set a password. Basic requirements – the length must be more than 8 characters, the password must include Arabic numerals, lowercase and uppercase letters of the Latin alphabet.

- Enter the one-time SMS password for two-factor authentication.
The program is launched and ready to work.
Attention! In case of difficulties, please contact customer support at 8 800 555 55 51. Our specialists will provide individual advice and help you log into the trading platform.
Webquik Sberbank – installation, connection and configuration of a terminal for trading in a web browser: https://youtu.be/Vp-vcc7y0tw
WebQuik API – connection and configuration
API – Application programming interface or application programming interface. This is a set of certain rules and algorithms for the operation of one computer program with another. The API is used to link two applications. This is necessary, for example, for data transmission. Unfortunately, QUIK does not have a full-fledged API for connection. This means that there is no “magic” library, the use of which will allow you to download data from the program and immediately send requests through it. However, there are other workarounds, and more specifically a bunch of DDE + TRANS2QUIK.dll + Qple + over9000Table = Quik Api. In simple words, in order to connect the API to the program, you must:
- Bring up your own DDE server in the application.
- Understand how the Qple language, which was used in the development of WebQUIK, works, and create scripts to convert candlestick arrays into tables and other data that will be needed to automatically create orders.
- Create about 10 tables that will be used to download data.
- Attach the TRANS2QUIK.dll library to the project and learn how to create requests through it.


ok transaction